Forum Migration Notice
We're transitioning to a more modern community platform by beginning of next year. Learn about the upcoming changes and what to expect.
Smart Component: Moving a mechanism sinusoidally
unni2007
✭
Hi @ all,
I am new to smart components and try to use one in order to move a mechanism sinusoidally, controllig amplitude, frequency and phase with input variables.
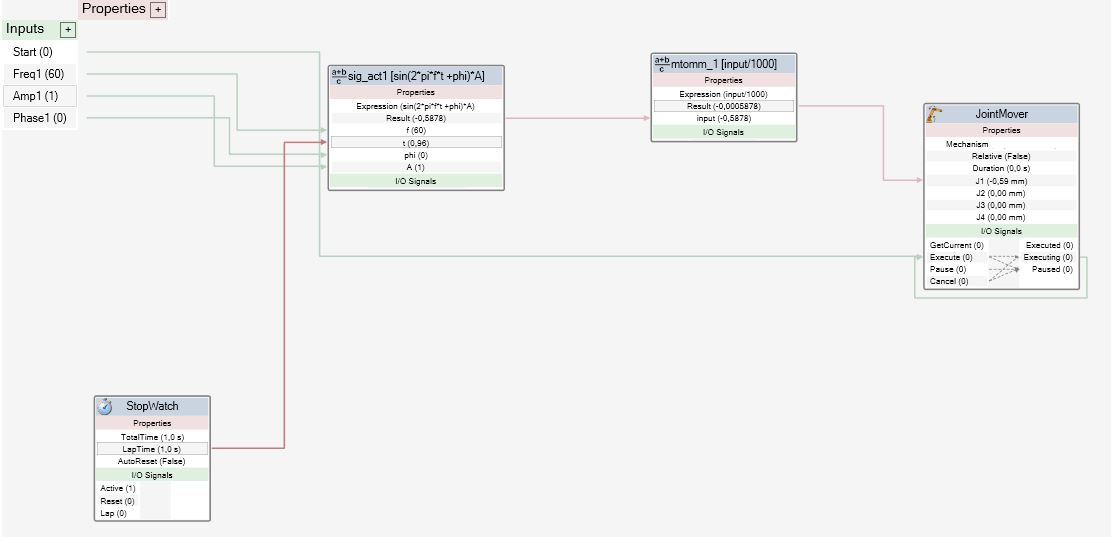
My idea was to use a clock and a math expression to calculate my sinus and connect the resulting value to a JointMover with my mechanism, so that the joint value changes over time (working).
To create a permanent movement, I connected the "executed" signal with the "execute" signal creating a loop. I also connected the "execute" signal to an input signal to start the movement for the first time. My problem now is that the JointMover is not executing the movements when I set the input start signal to "1" (via I/O simulator when simulation is running).
I am very grateful for ideas on how to make it work.


Best regards
Kris
Kris
Post edited by unni2007 on
Tagged:
0
Comments
-
Have you connected the smart component input signal to an output signal from the controller in the station logic (on the simulation tab)?
This can be thought of as wiring the output on the controller to the input on your smart component .
0 -
Hey graemepaulin,
does it make a difference if i set the signal via a controller output or directly via I/O simulator? I tried your suggestion, but got the same result.
It seems like the "executed" signal is not set because of the permanently changing joint-value. Therefore the movement stops after one timestep.
For now I got it working by using a MultiTimer that triggers the "execute" signal of the JointMover with a pulse every timestep.
Cheers
Kris
0 -
Great you have it working.
What exactly do you mean by the I/O simulator? If you are triggering the input in the smart component properties then there is no difference.
0 -
Under the "Simulation" Tab there is the "I/O Simulator" button where you can set the signals of the selected system. I assume it is the same as to set them in the properties of the smart component.0
-
Hi all !!I have read the question and I would have liked to offer you this solution.

In this case, my mecanisme can move between 0 and 745mm. So I have added an offset. Here, when you stop the move, the restart continue the movement from the current position.
Note : the interval for the Timer is not 0 but 0,02. the movement is more smooth.
BR !0 -
Thank you very much for your solution, I didn't even recognize the clock was redundant in my case!
Always nice to see somebody else's approach.
Best regards0
Categories
- All Categories
- 5.7K RobotStudio
- 401 UpFeed
- 21 Tutorials
- 16 RobotApps
- 306 PowerPacs
- 407 RobotStudio S4
- 1.8K Developer Tools
- 251 ScreenMaker
- 2.9K Robot Controller
- 367 IRC5
- 91 OmniCore
- 8 RCS (Realistic Controller Simulation)
- 858 RAPID Programming
- 43 AppStudio
- 4 RobotStudio AR Viewer
- 19 Wizard Easy Programming
- 111 Collaborative Robots
- 5 Job listings
